
Archive for the ‘Windows’ Category
I’ve been a OS X user for just over 3 years when I migrated from a laptop that dual booted Windows 7 and Linux. I like my MacBook Pro a lot but time moves on and I needed a new laptop. For reasons that I’ll write about in more depth another time, I’ve decided to move back into the Microsoft ecosystem for a while and try using Windows 10 on a Dell XPS 15 as my daily driver.
Windows is a lot better for Research Software Engineers than it used to be (See Bash on Windows: The scripting game just changed for an example of why) and I find myself enjoying using it rather than suffering it just because my clients use it. Mostly!
Windows is cheap and tacky
So why am I disappointed? In short, its because Windows still hasn’t grown up. It’s cheap, tacky and is constantly trying to sell me stuff.
It started off in the lock screen

Other people were quick to agree. Adverts in Windows 10 are a problem

The Start Menu is also full of third party applications that I’d rather not have…Games like Candy Crush Soda Saga and Royal Revolt 2 for example. These used to be the sort of bloatware you’d get with OEM’s when you bought a new, cheap laptop and the solution used to be ‘Wipe the laptop and install a clean copy of Windows’ but now the bloatware is coming from Windows itself. Sure, I can uninstall it but I shouldn’t have to.
We’re not in Mac OS X anymore toto!
Cleaning up Windows’ act
How to disable Windows 10 built in advertising from HowToGeek can help turn off all of this tat and others have pointed to scripted options that I’ve not tried myself (I suggest caution before running PowerShell scripts you do not understand).
All of this shouldn’t be necessary. I paid over £2,000 for this laptop and I expect a professional experience from the operating system that it comes with.
I expected better. I’m disappointed.
Like many people, I was excited to learn about the new Linux subsystem in Windows announced by Microsoft earlier this year (See Bash on Windows: The scripting game just changed).
Along with others, I’ve been playing with it on the Windows Insider builds but now that the Windows Anniversary Update has been released, everyone can get in on the action.
Activating the Linux Subsystem in Windows
Once you’ve updated to the Anniversary Update of Windows, here’s what you need to do.
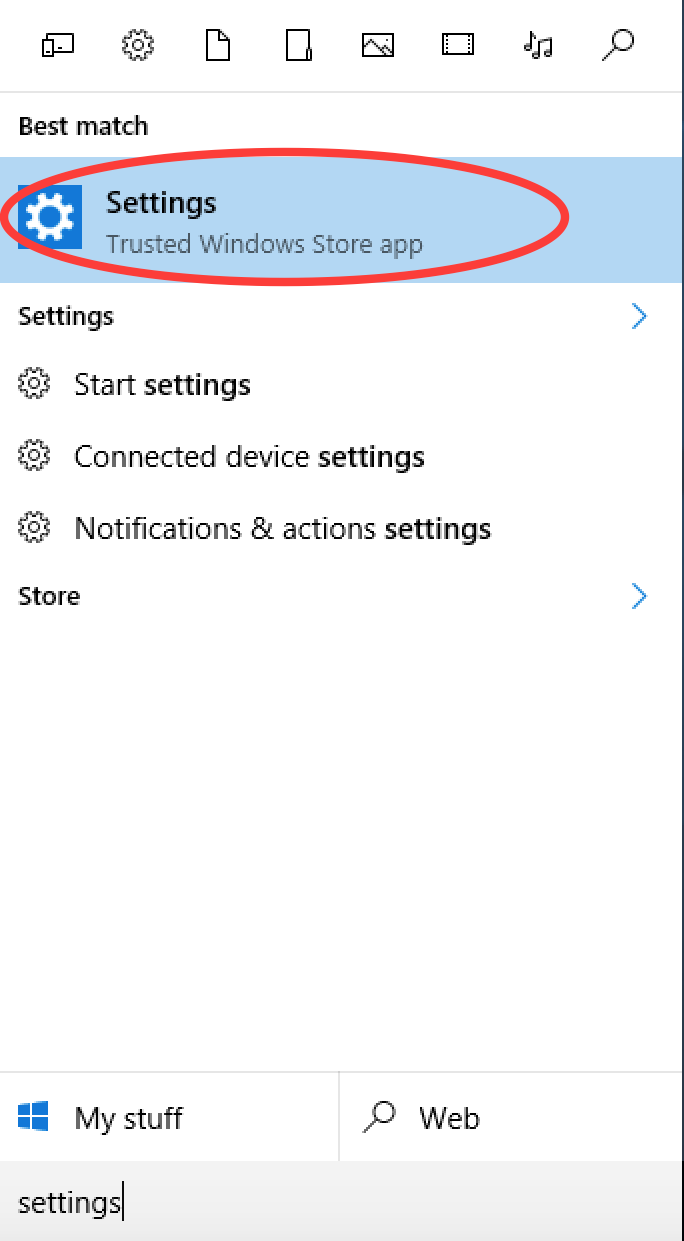
Open settings
In settings, click on Update and Security

In Update and Security, click on For developers in the left hand pane. Then click on Developer mode.

Take note of the Use developer features warning and click Yes if you are happy. Developer mode gives you greater power, and with great power comes great responsibility.

Reboot the machine (may not be necessary here but it’s what I did).
Search for Features and click on Turn Windows features on or off
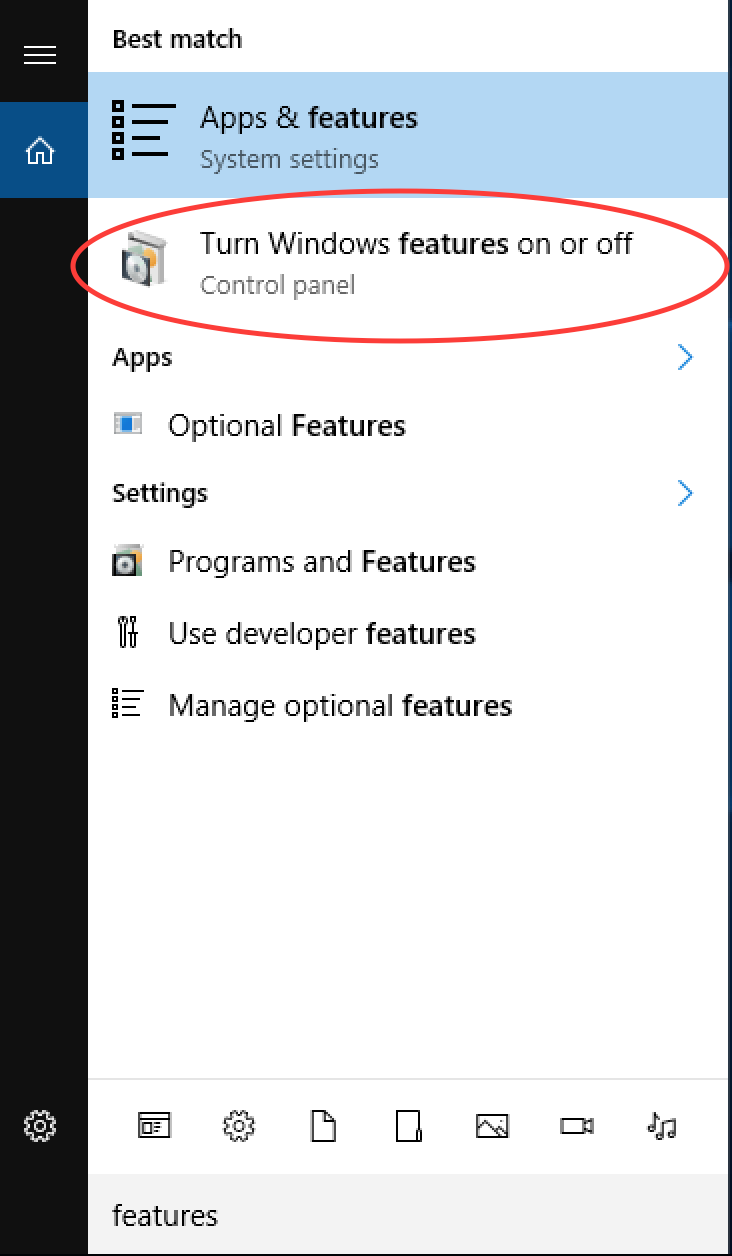
Tick Windows Subsystem for Linux (Beta) and click OK

When it’s finished churning, reboot the machine.
Launch cmd.exe
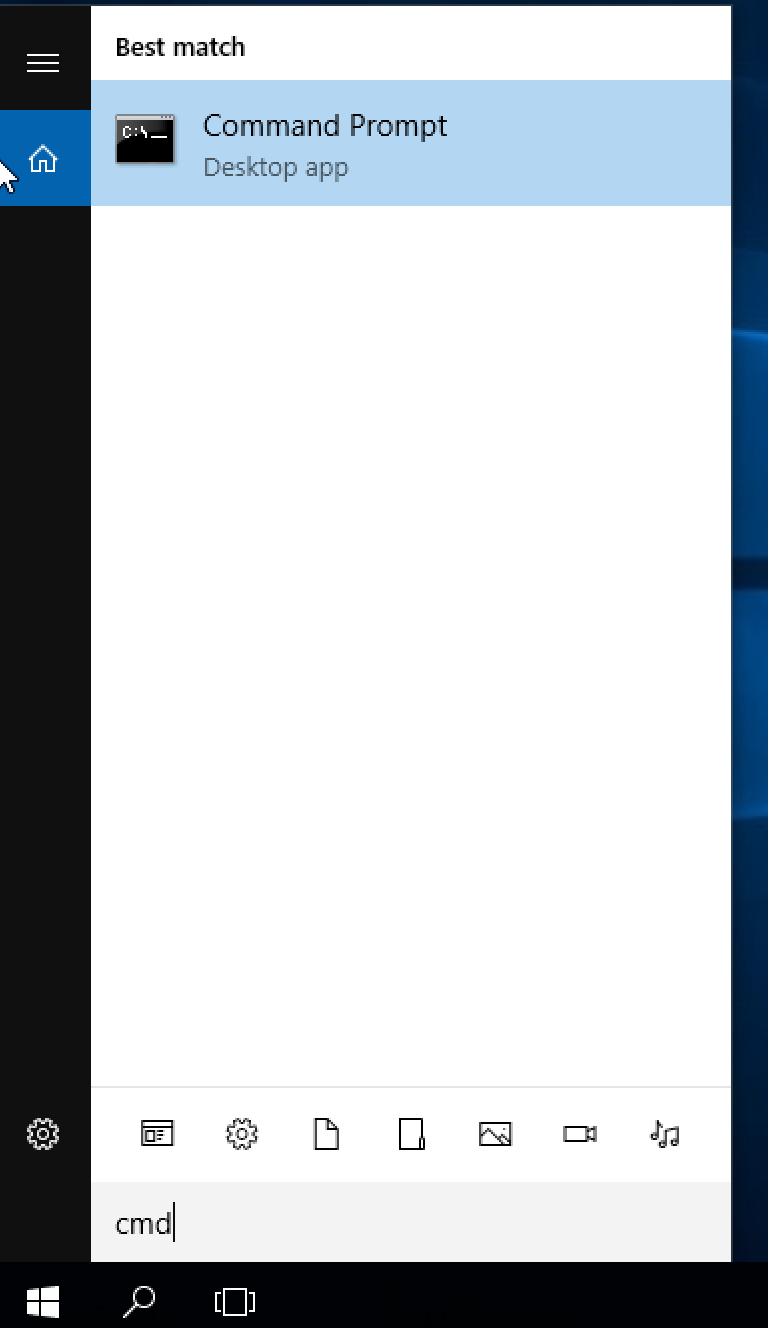
Type bash, press enter and follow the instructions
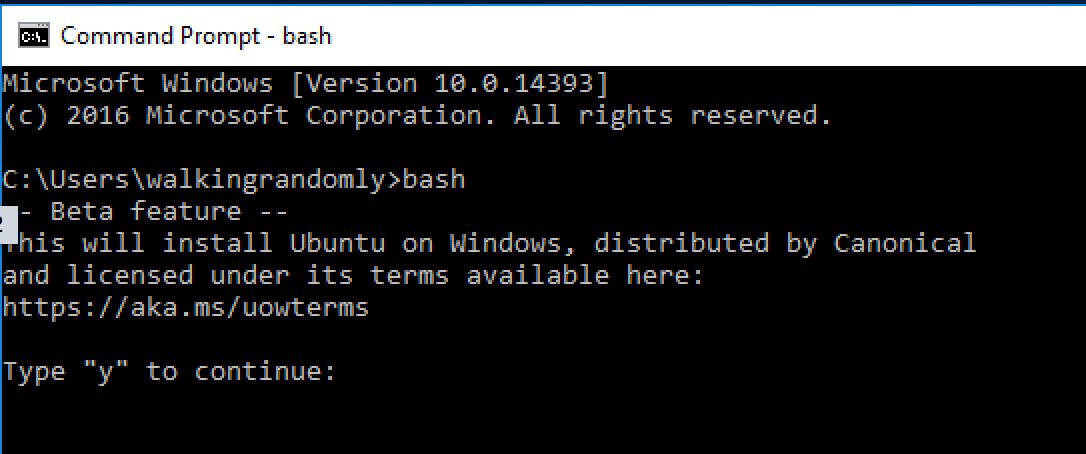
The linux subsystem will be downloaded from the windows store and you’ll be asked to create a Unix username and password.
Try something linux-y
The short version of what’s available is ‘Every userland tool that’s available for Ubuntu’ with the caveat that anything requiring a GUI won’t work.
This isn’t emulation, it isn’t cygwin, it’s something else entirely. It’s very cool!
The gcc compiler isn’t installed by default so let’s fix that:
sudo apt-get install gcc
Using your favourite terminal based editor (I used vi), enter the following ‘Hello World’ code in C and call it hello.c.
/* Hello World program */

#include

int main()
{
    printf("Hello World from C\n");

    return(0);
}
Compile using gcc
gcc hello.c -o hello
Run the executable
./hello
Hello World from C
Now, transfer the executable to a modern Ubuntu machine (I just emailed it to myself) and run it there.
That’s right – you just wrote and compiled a C-program on a Windows machine and ran it on a Linux machine.
Now install cowsay — because you can:
sudo apt-get install cowsay
cowsay 'Hello from Windows'
 ____________________
< Hello from Windows >
 --------------------
        \   ^__^
         \  (oo)\_______
            (__)\       )\/\
                ||----w |
                ||     ||
Update 1:
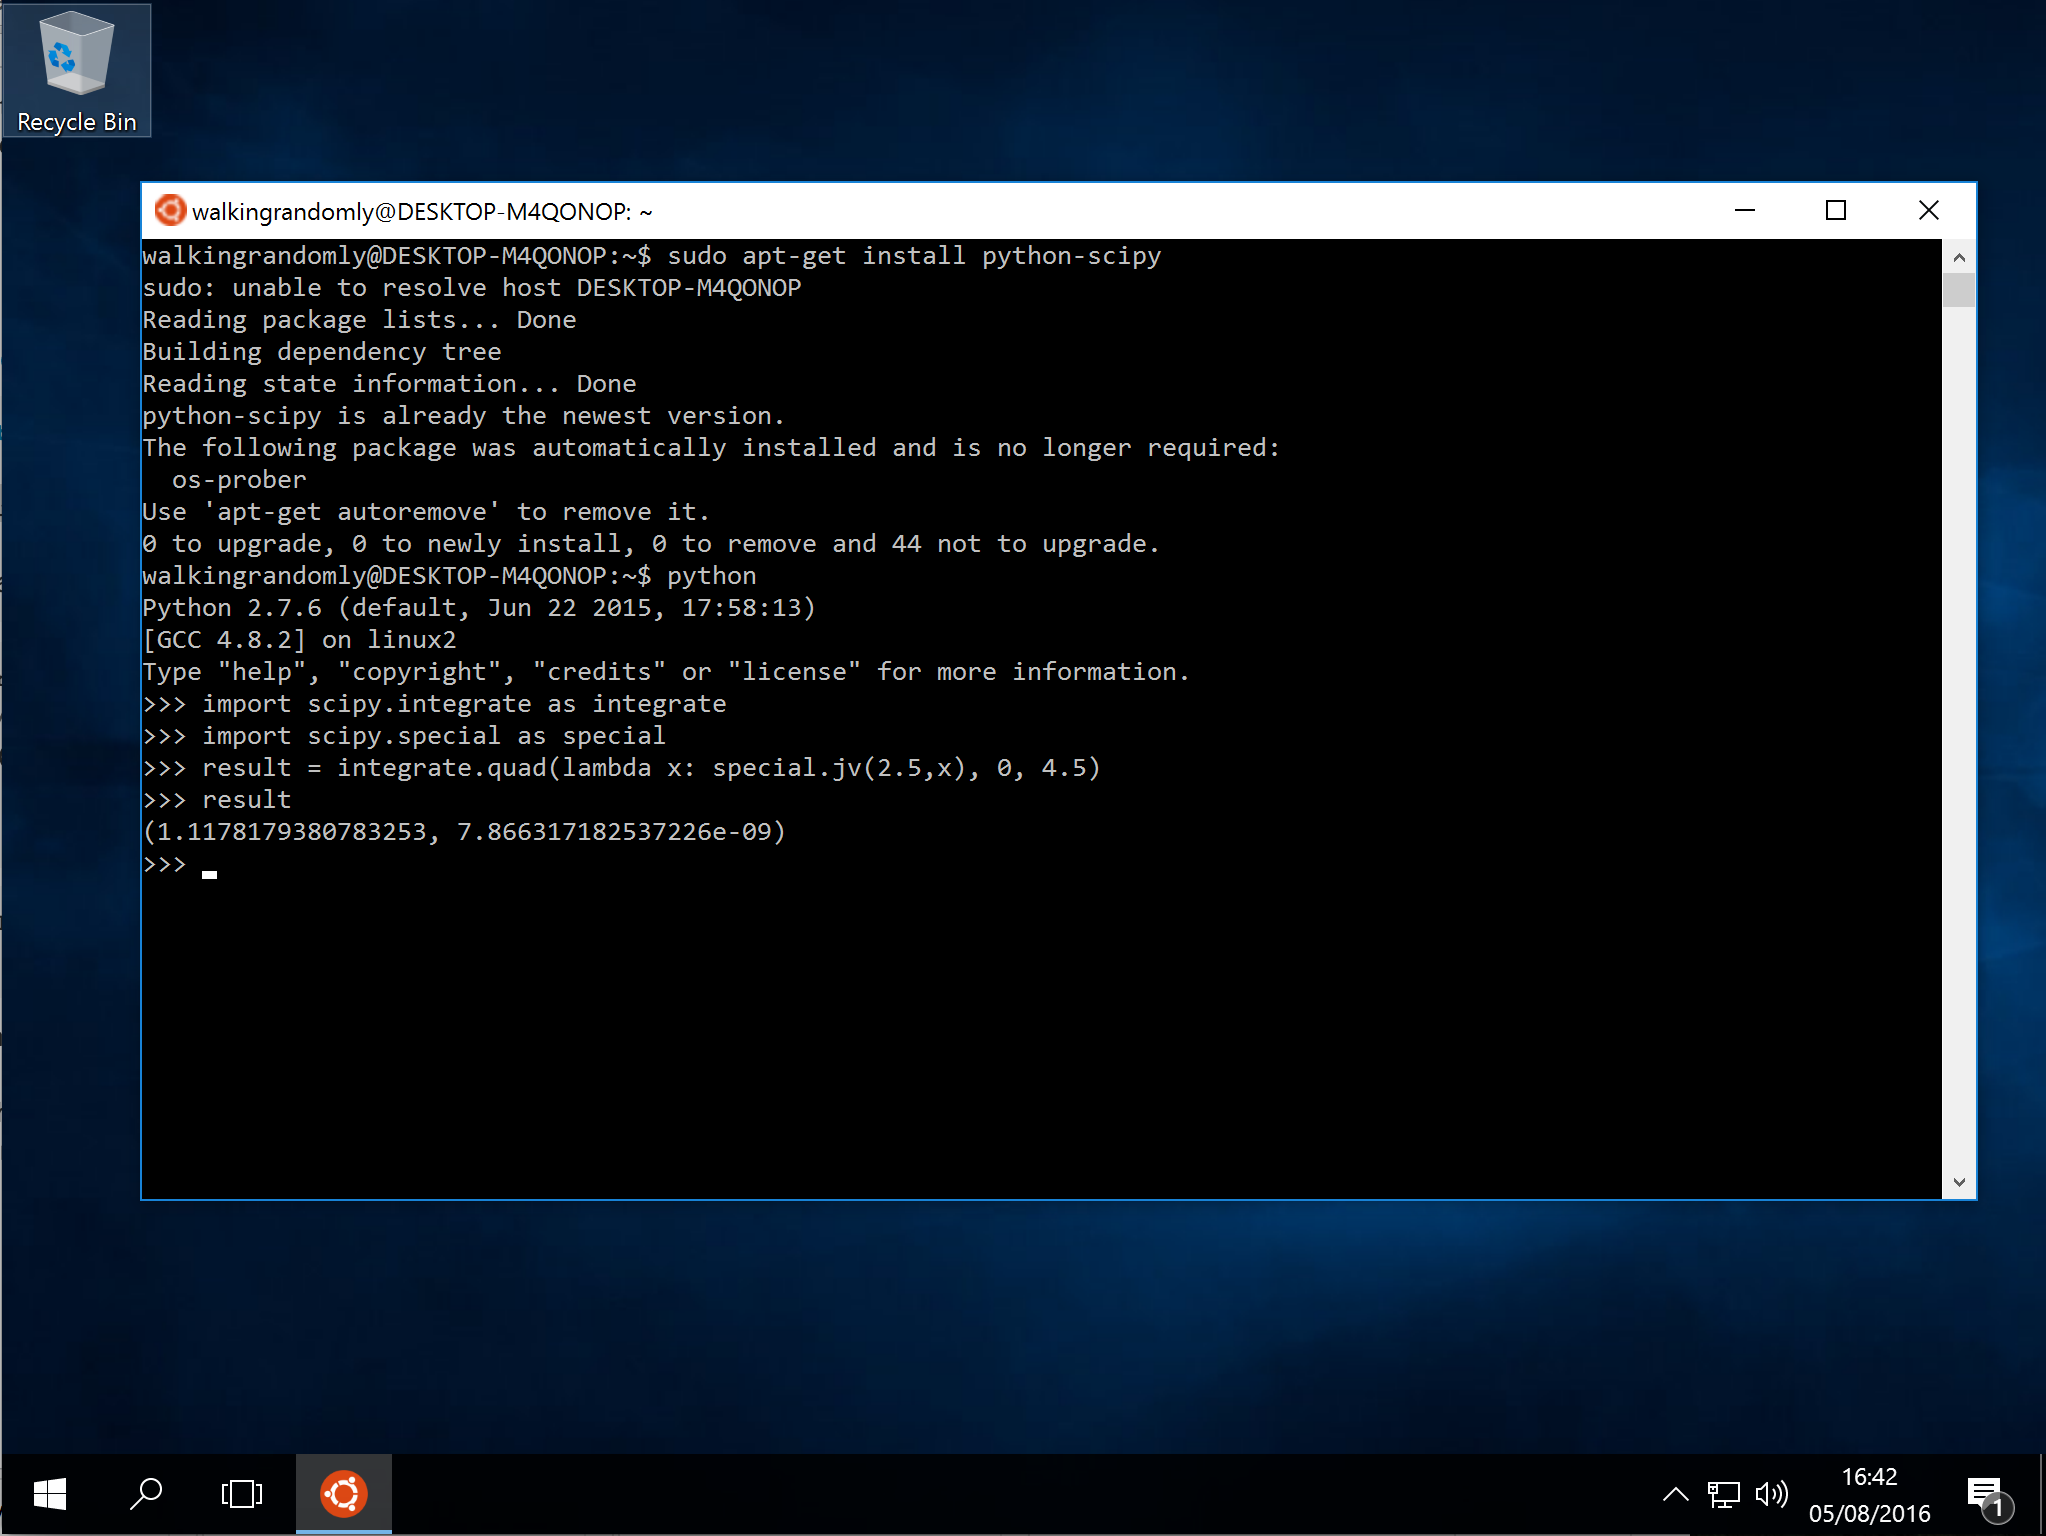
I was challenged by @linuxlizard to do a follow up tutorial that showed how to install the scientific Python stack — Numpy, SciPy etc.
@walkingrandomly Follow up with HOWTO on installing NumPy, SiPy, Pillow, etc. :-)
— David Poole (@linuxlizard) August 5, 2016
It’s all there :)
sudo apt-get install python-scipy
Update 2
TensorFlow on LinuxOnWindows is also easy: http://www.hanselman.com/blog/PlayingWithTensorFlowOnWindows.aspx
The University of Sheffield recently purchased licenses for the Windows version of the Intel compiler suite and I’m involved in the release to campus process. As part of this, I wrote some basic documentation on how to compile Hello World using the Intel C++ Compiler within Visual Studio Community Edition 2015. Since this may be useful to people outside of University of Sheffield, I reproduce this part of our documentation here.
These notes were prepared using Intel C++ XE 2015 version 15.0.6 and Visual Studio Community Edition 2015 RTM version. Note that there are problems with using this version of Intel C++ and later versions of Visual Studio Community Edition.
Click on any of the images to see them full size.
- Launch Visual Studio and click on File->New Project
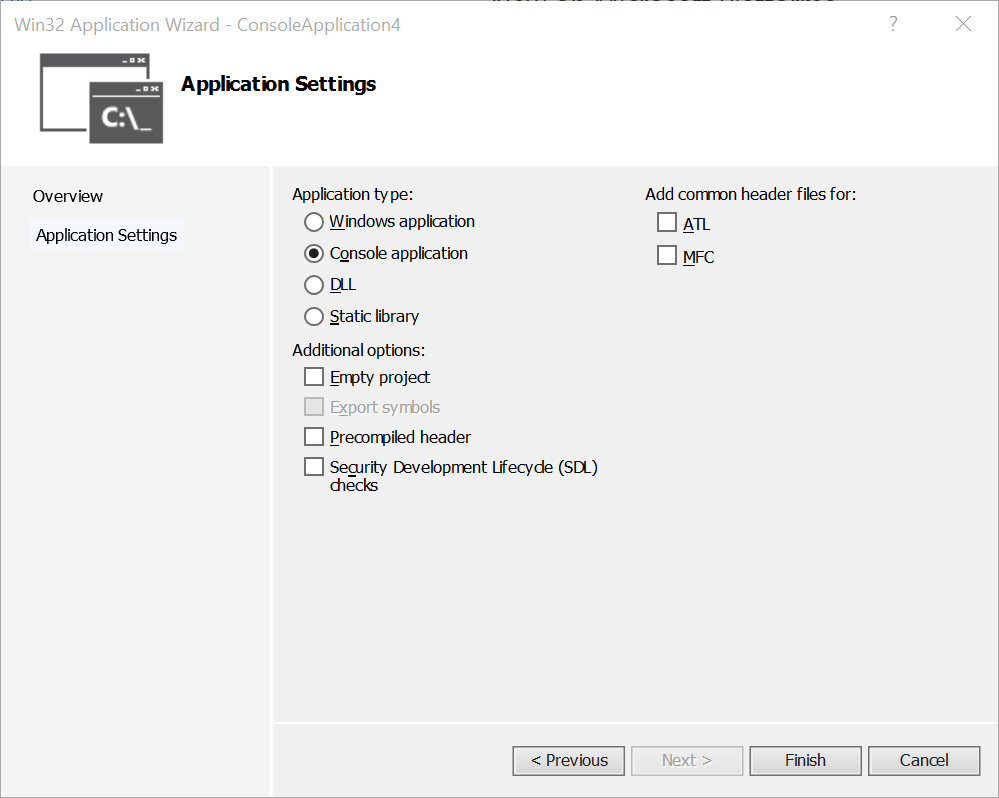
- Choose Visual C++ -> Win32 Console Application and give your project a name.

- In the Win32 Application wizard, untick Precompiled header and Security Development Lifecycle (SDL) checks and click Finish.
- A skeleton main() function will appear. Modify the code so that it reads
#include

int main()
{
    std::cout << "Hello World";
    return 0;
}
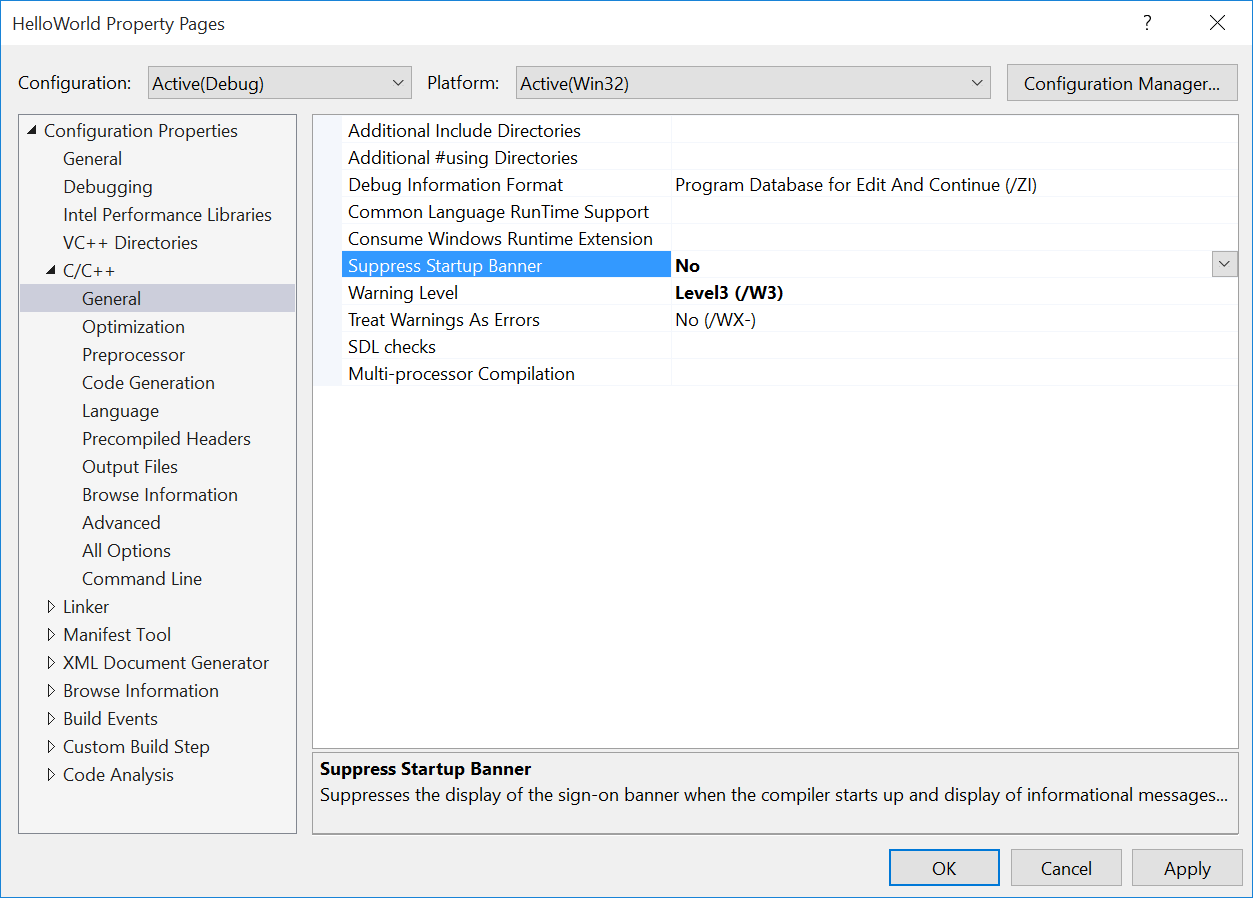
- Click on Project->HelloWorld Properties and under the C++ -> General section, ensure that Suppress Startup Banner is set to No and click OK. This will ensure that when you compile, you’ll be able to see that it’s the Intel Compiler doing the work rather than Visual Studio C++.
- Click on Project->Intel Compiler->Use Intel C++
- Build and run the code by pressing CTRL F5. You should see something like the following
>------ Build started: Project: HelloWorld, Configuration: Debug Win32 ------
1>  icl /Qvc14 "/Qlocation,link,C:\Program Files (x86)\Microsoft Visual Studio 14.0\VC\bin" /ZI /W3 /Od /Qftz- -D __INTEL_COMPILER=1500 -D WIN32 -D _DEBUG -D _CONSOLE -D _UNICODE -D UNICODE /EHsc /RTC1 /MDd /GS /Zc:wchar_t /Zc:forScope /FoDebug\ /FdDebug\vc140.pdb /Gd /TP HelloWorld.cpp stdafx.cpp
1>
1>  Intel(R) C++ Compiler XE for applications running on IA-32, Version 15.0.6.285 Build 20151119
1>  Copyright (C) 1985-2015 Intel Corporation.  All rights reserved.
Once the compilation has completed, a console window should pop up showing the Hello World output.
Yesterday saw the biggest highlight in the technical calendar so far for me… Microsoft has brought the Linux command line to Windows.
Excited by the command line
OK, so I’ll admit it….improvements to command line tools seriously excite me! Windows 10 brought in a couple of minor improvements to the command line last year and I acted like it was a second birthday. Imagine then, the excitement I felt while watching Microsoft’s announcement of linux integration into Windows (Spin to 2:24 to see it). I could barely form sentences! When my wife came into the kitchen to see what the commotion was, all I could manage was “Bash! On Windows!….GIT! OMG! Not a VM! vi..sed..awk…gcc! OMG!’
So why so much excitement?
Shell scripts are more than mere automation, they are repositories of knowledge – they do some task for you and also explain how that task is done. They are wonderful things that can educate, take the drudgery out of a researcher’s life and lead to more reproducible research. The problem is that Linux and Mac users speak a different scripting language (Bash) to Windows users (Windows batch or more, recently, PowerShell).
In short, a script written on a Linux or Mac machine wouldn’t run on a Windows machine unless you jumped through some hoops.
Bash just became a cross-platform scripting solution
Various solutions for running Bash scripts on Windows have existed for a while. Cygwin, for example, compiles linux tools to run on Windows which works very effectively for many situations. Additionally, the Windows version of git comes with an emulated Bash mode that’s good enough to teach the scripting lesson from Software Carpentry. Neither of these solutions are perfect, however, and to me they’ve always felt like slightly awkward patches. The resulting binaries in projects such as Cygwin are necessarily different from those used in Linux Land.
This new collaboration between Canonical and Microsoft changes the game! Now, Linux tools appear like first-class citizens in the Windows world. When you run Bash on Windows, it will be the exact same Bash that’s run on Linux. An automated research analysis developed on a Linux machine will work exactly the same way on Windows.
The same skills apply, from tablet to supercomputer
Furthermore, when we teach introductory shell scripting to researchers we will be teaching them tools that allows them to work on all operating systems and all hardware types.
The same skills will apply to Mac, Linux and Windows from tablets to High Performance Computing clusters and that’s a wonderful thing.
I recently tried to use the XE 2015 Update 6 version of the Intel C++ compiler with Visual Studio Community Edition 2015 Update 1. Even a simple Hello World console application didn’t work. I got lots of compilation errors that looked like this
1>C:\Program Files (x86)\Microsoft Visual Studio 14.0\VC\include\exception(248): error : expected an attribute name
1>    [[noreturn]] _CRTIMP2_PURE void __CLRCALL_PURE_OR_CDECL __ExceptionPtrRethrow(_In_ const void*);
1>     ^
There are two solutions to this problem.
- Solution 1. Downgrade Visual Studio Community Edition 2015 to the RTM version. The way I did this was to uninstall the Update 1 version and then install the RTM version using the .iso file at https://www.microsoft.com/en-us/download/details.aspx?id=48146 (Thanks to the Visual Studio twitter team for this link!)
- Solution 2. Upgrade the Intel C++ Compiler to XE 2016.
Due to the demands of my job and the fact that I like shiny new technology, I’m pretty much operating system agnostic these days. I find myself flitting between Windows, Linux, Mac OS X, Android and iOS on a regular basis and find them all delightful and head-smackingly frustrating in equal measure.
One of my geeky guilty pleasures is taking some time out to kick the tyres of a new operating system and so I’m having a lot of fun with Windows 10 right now. I tend not to play with preview builds so all of this is new to me.
The Windows command prompt hasn’t seen much love in decades and yet it’s so important to the work I do. In Windows 10, it’s received a much needed update. Right at the top of the list are improvements to copy and paste. In older versions of windows, this is my workflow I go to a new machine:
- Using CTRL-V, try to copy and paste into the command line. It doesn’t work. You get ^V appear instead
- Sigh and mutter to yourself. Right click on the top of the window. Choose properties. Enable Quick Edit mode.
- Press CTRL-V again. ^V appears. Press it a few more times ^V^V^V^V
- Remember that in cmd.exe, unlike all other applications in Windows, the way to paste is to right click. Mutter again. Get on with life.
In Windows 10, quick edit mode is enabled by default and CTRL-V just works. Happy days!
There’s a whole host of other improvements including word-wrap, transparencies, the ability to resize the window and more. I feel like the Windows command prompt has taken its first step into a larger world.
Microsoft have also set up a discussion forum for the future of the Command Prompt.
If you change it, It will break
“It only works on the Windows version of MATLAB 2010a. The code doesn’t work on Linux or other versions of MATLAB.” explained the researcher. He needed to run his program hundreds of times and his solution was to lock himself into a computer room over the weekend, log into the two dozen managed desktop machines there and manually start his code running on each one. Along with colleagues from the University of Manchester, I was trying to understand why he couldn’t use the Linux-based 3000+ core Condor pool we’d built since it was perfectly suited to his workflow.
Now, when he said ‘doesn’t work‘ what he meant was ‘gives different results’ and the only ones he liked were the ones that came from MATLAB 2010a on Windows. Naturally, I offered to take a look at his code with a view to figuring out what was going on but he simply wasn’t interested. Once he determined that we couldn’t (or more accurately, wouldn’t) stop his current workflow he thanked us for our interest and left.
Different strokes results for different folks
This wasn’t the first time I had discovered research code that gave different results when run on different operating systems or runtimes and it probably won’t be the last. A relatively high profile case that caught my eye recently was a publication that demonstrated that the results of a program called FreeSurfer varied according to operating system, workstation type and software version.
I suspect that the phenomenon might be more prevalent than we think because I suspect (but confess to having no evidence) that a large number of computational research results come from research code that’s only ever been run on one operating system, with one set of dependencies on one particular piece of hardware.
Experience has shown me that some researchers deal with this lack of robustness by keeping their working environment as constant as possible. Don’t. Touch. Anything!
The shifting sands of Windows 10
A huge percentage of researchers conduct their research using Windows and the Windows environment is about to change in a rather fundamental way: Updates will be automatic and mandatory.
Since the operating system will be constantly shifting under their feet, researchers are no longer going to be able to keep that aspect of their environment stable.
I wonder if or how this will change things in the world of research software. Perhaps it will go by unnoticed, perhaps more test-suites will be written or perhaps something else?
Any thoughts?
I recently found myself in need of a portable install of the Jupyter notebook which made use of a portable install of R as the compute kernel. When you work in institutions that have locked-down managed Windows desktops, such portable installs can be a life-saver! This is particularly true when you are working with rapidly developing projects such as Jupyter and IRKernel.
It’s not perfect but it works for the fairly modest requirements I had for it. Here are the steps I took to get it working.
Download and install Portable Python
I downloaded Portable Python 2.7.6.1 from http://portablepython.com/ and installed into a directory called Portable Python 2.7.6.1
Update IPython and install the extra modules we need
This version of Portable Python comes with a portable IPython instance but it is too old to support alternative kernels. As such, we need to install a newer version.
Open a cmd.exe command prompt and navigate to Portable Python 2.7.6.1\App\Scripts.
Enter the command
easy_install ipython.exe
You’ll now find that you can launch the ipython.exe terminal from within this directory:
C:\Users\walkingrandomly\Desktop\Portable Python 2.7.6.1\App\Scripts>ipython
Python 2.7.6 (default, Nov 10 2013, 19:24:18) [MSC v.1500 32 bit (Intel)]
Type "copyright", "credits" or "license" for more information.

IPython 3.1.0 -- An enhanced Interactive Python.
?         -> Introduction and overview of IPython's features.
%quickref -> Quick reference.
help      -> Python's own help system.
object?   -> Details about 'object', use 'object??' for extra details.

In [1]: exit()
If you try to launch the notebook, however, you’ll get error messages. This is because we haven’t taken care of all the dependencies. Let’s do that now. Ensuring you are still in the Portable Python 2.7.6.1\App\Scripts folder, execute the following commands.
easy_install pyzmq
easy_install jinja2
easy_install tornado
easy_install jsonschema
You should now be able to launch the notebook using
ipython notebook
Install portable R and IRKernel
- I downloaded Portable R 3.2 from http://sourceforge.net/projects/rportable/files/ and installed into a directory called R-Portable
- Move this directory into the Portable Python directory. It needs to go inside Portable Python 2.7.6.1\App (see this discussion to learn how I discovered that this location was the correct one)
- Launch the Portable R executable which should be at Portable Python 2.7.6.1\App\R-Portable\R-portable.exe and install the IRKernel packages by doing
install.packages(c("rzmq","repr","IRkernel","IRdisplay"), repos="http://irkernel.github.io/")
Install additional R packages
The version of Portable R I used didn’t include various necessary packages. Here’s how I fixed that.
- Launch the Portable R executable which should be at Portable Python 2.7.6.1\App\R-Portable\R-portable.exe and install the following packages
install.packages('digest')
install.packages('uuid')
install.packages('base64enc')
install.packages('evaluate')
install.packages('jsonlite')
Install the R kernel file
Create the directory structure Portable Python 2.7.6.1\App\share\jupyter\kernels\R_kernel
Create a file called kernel.json that contains the following
{"argv": ["R-Portable/App/R-Portable/bin/i386/R.exe","-e","IRkernel::main()",
"--args","{connection_file}"],
 "display_name":"Portable R"
}
This file needs to go in the R_kernel directory created earlier. Note that the kernel location specified in kernel.json uses Linux style forward slashes in the path rather than the backslashes that Windows users are used to. I found that this was necessary for the kernel to work –it was ignored by the notebook otherwise.
Finishing off
Everything created so far, including R, is in the folder Portable Python 2.7.6
I created a folder called PortableJupyter and put the Portable Python 2.7.6 folder inside it. I also created the folder PortableJupyter\notebooks to allow me to carry my notebooks around with the software that runs them.
There is a bug in Portable Python 2.7.6.1 relating to scripts like IPython.exe that have been installed using easy_install. In short, they stop working if you move the directory they’re installed in – breaking portability somewhat! (Details here)
The workaround is to launch Ipython by running the script Portable Python 2.7.6.1\App\Scripts\ipython-script.py
I didn’t want to bother with that so created a shortcut in my PortableJupyter folder called Launch notebook. The target of this shortcut was the following line
%windir%\system32\cmd.exe /c "cd notebooks && "%CD%/Portable Python 2.7.6.1/App\python.exe" "%CD%/Portable Python 2.7.6.1\App\Scripts\ipython-script.py" notebook"
This starts the notebook using the default web browser and puts you in the notebooks directory.
The pay off
My folder looks like this:

If I click on the Launch Notebook shortcut, I get a Jupyter session with 2 kernel options
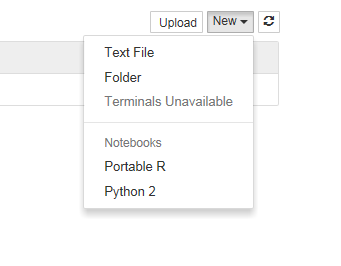
I can choose the Portable R kernel and start using R in the notebook!

From time to time I find myself having to write or modify windows batch files. Sometimes it might be better to use PowerShell, VBScript or Python but other times a simple batch script will do fine. As I’ve been writing these scripts, I’ve kept notes on how to do things for future reference. Here’s a summary of these notes. They were written for my own personal use and I put them here for my own convenience but if you find them useful, or have any comments or corrections, that’s great.
These notes were made for Windows 7 and may contain mistakes, please let me know if you spot any. If you use any of the information here, we agree that its not my fault if you break your Windows installation. No warranty and all that.
These notes are not meant to be a tutorial.
Comments
Comments in windows batch files start with REM. Some people use :: which is technically a label. Apparently using :: can result in faster script execution (See here and here). I’ve never checked.
REM This is a comment
:: This is a comment too...but different. Might be faster.
If statements
If "%foo%"=="bar" (
REM Do stuff
REM Do more stuff
)
else (
REM Do different stuff
)
Check for existence of file
if exist {insert file name here} (
    rem file exists
) else (
    rem file doesn't exist
)
Or on a single line (if only a single action needs to occur):
if exist {insert file name here} {action}
for example, the following opens notepad for autoexec.bat, if the file exists:
if exist c:\autoexec.bat notepad c:\autoexec.bat
Echoing and piping output
To get a newline in echoed output, chain commands together with &&
echo hello && echo world
gives
hello
world
To pipe output to a file use > or >> The construct 2>&1 ensures that you get both standard output and standard error in your file
REM > Clobbers log.txt, overwriting anything you already have in it
"C:\SomeProgram.exe" > C:\log.txt 2>&1

REM >> concatenates output of SomeProgram.exe to log.txt
"C:\SomeProgram.exe" >> C:\log.txt 2>&1
Environment Variables
set and setx
- set – sets variable immediately in the current context only. So, variable will be lost when you close cmd.exe.
- setx – sets variable permanently but won’t be valid until you start a new context (i.e. open a new cmd.exe)
List all environment variables defined in current session using the set command
set
To check if the environment variable FOO is defined
if defined FOO (
 echo "FOO is defined and is set to %FOO%"
)
To permanently set the system windows environment variable FOO, use setx /m
setx FOO /m "someValue"
To permanently unset the windows environment variable FOO, set it to an empty value
setx FOO ""
A reboot may be necessary. Strictly speaking this does not remove the variable since it will still be in the registry and will still be visible from Control Panel->System->Advanced System Settings->Environment variables. However, the variable will not be listed when you perform a set command and defined FOO will return false. To remove all trace of the variable, delete it from the registry.
Environment variables in the registry
On Windows 7:
- System environment variables are at HKEY_LOCAL_MACHINE\SYSTEM\CurrentControlSet\Control\Session Manager\Environment
- User environment variables are at HKEY_CURRENT_USER\Environment
If you change environment variables using the registry, you will need to reboot for them to take effect.
Pausing
This command will pause for 10 seconds
TIMEOUT /T 10
Killing an application
This command will kill the notepad.exe window with the title Readme.txt
taskkill /f /im notepad.exe /fi "WINDOWTITLE eq Readme.txt"
Time stamping
The variable %time% expands to the current time which leads you to do something like the following to create time stamps between the execution of commands.
echo %time%
timeout /t 1
echo %time%
This works fine unless your code is in a block (i.e. surrounded by brackets), as it might be if it is part of an if-statement for example:
(
echo %time%
timeout /t 1
echo %time%
)
If you do this, the echoed time will be identical in both cases because the %time% entries get parsed at the beginning of the code block. This is almost certainly not what you want.
Setlocal EnableDelayedExpansion
(
echo !time!
timeout /t 1
echo !time!
)
Now we get the type of behaviour we expect.
Where is this script?
Sometimes your script will need to know where it is. Say test.bat is at C:\Users\mike\Desktop\test.bat and contains the following
set whereAmI=%~dp0
When you run test.bat, the variable whereAmI will contain C:\Users\mike\Desktop\
Details on %dp0 can be found at StackOverflow.
Variable substrings
This came from StackOverflow’s Hidden features of Windows batch files which is a great resource. They’ve tightened up on what constitutes a ‘valid question’ these days and so great Q+A such as this won’t be appearing there in future.
> set str=0123456789
> echo %str:~0,5%
01234
> echo %str:~-5,5%
56789
> echo %str:~3,-3%
3456
I recently installed the 64bit version of the Intel C++ Composer XE 2013 on a Windows 7 desktop alongside Visual Studio 2010. Here are the steps I went through to compile a simple piece of code using the Intel Compiler from within Visual Studio.
- From the Windows Start Menu click on Intel Parallel Studio XE 2013->Parallel Studio XE 2013 with VS2010

- Open a new project within Visual Studio: File->New Project
- In the New Project window, in the Installed Templates pane, select Visual C++ and click on Win32 Console Application. Give your project a name. In this example, I have called my project ‘helloworld’. Click on OK.

- When the Win32 Application Wizard starts, accept all of the default settings and click Finish.
- An example source file will pop up called helloworld.cpp. Modify the source code so that it reads as follows
#include "stdafx.h"
#include<iostream>
using namespace std;

int _tmain(int argc, _TCHAR* argv[])
{
	cout << "Hello World";
        cin.get();
	return 0;
}
We now need to target a 64bit platform as follows:
- Click on Project->helloworld Properties->Configuration Properties and click on Configuration Manager.

- The drop down menu under Active Solution Platform will say Win32. Click on this and then click on New.

- In the New Solution Platform window choose x64 and click on OK.

- Close the Configuration Manager and to return to the helloworld Property Pages window.
- At the helloworld Property Pages window click on C/C++ and ensure that Suppress Startup Banner is set to No and click OK.

- Click on Project->Intel Composer XE 2013->Use Intel C++ followed by OK. This switches from the Visual Studio Compiler to the Intel C++ compiler.
- Finally, build the project by clicking on Build->Build Solution. Somewhere near the top of the output window you should see
1> Intel(R) C++ Intel(R) 64 Compiler XE for applications running on Intel(R) 64,
Version 13.0.1.119 Build 20121008
1> Copyright (C) 1985-2012 Intel Corporation. All rights reserved.
This demonstrates that we really are using the Intel Compiler to do the compilation.
- Once compilation has completed you can run the application by pressing F5. It should open a console window that will disappear when you press Enter.
