Archive for the ‘Linux’ Category
My preferred workflow for writing technical documents these days is to write in Markdown (Or Jupyter Notebooks) and then use Pandoc to convert to PDF, Microsoft Word or whatever format is required by the end client.
While working with a markdown file recently, the pandoc conversion to PDF failed with the following error message
! Undefined control sequence.
l.117 \[ \coloneqq
This happens because Pandoc first converts the Markdown file to LaTeX which then gets compiled to PDF and the command \coloneqq isn’t included in any of the LaTeX packages that Pandoc uses by default.
The coloneqq command is in the mathtools package which, on Ubuntu, can be installed using
apt-get install texlive-latex-recommended
Once we have the package installed, we need to tell Pandoc to make use of it. The way I did this was to create a Pandoc metadata file that contained the following
---
header-includes: |
            \usepackage{mathtools}
---
I called this file pandoc_latex.yml and passed it to Pandoc as follows
pandoc --metadata-file=./pandoc_latex.yml ./input.md -o output.pdf
On one system I tried this on, I received the following error message
pandoc: unrecognized option `--metadata-file=./pandoc_latex.yml'
which suggests that the –metadata-file option is a relatively recent addition to Pandoc. I have no idea when this option was added but if this happens to you, you could try installing the latest version from https://github.com/jgm/pandoc/
I used 2.7.1.1 and it was fine so I guess anything later than this should also be OK.
I have been an advocate of the Windows Subsytem for Linux ever since it was released (See Bash on Windows: The scripting game just changed) since it allows me to use the best of Linux from my windows laptop. I no longer dual boot on my personal machines and rarely need to use Linux VMs on them either thanks to this technology. I still use full-blown Linux a lot of course but these days it tends to be only on servers and HPC systems.
I recently needed to compile and play with some code that was based on the GNU Scientific Library. Using the Ubuntu 18.04 version of the WSL this is very easy. Install the GSL with
sudo apt-get install libgsl-dev
A simple code that evaluates Dawson’s integral over a range of x values is shown below. Call this dawson.cpp
#include<iostream>
#include<vector>
#include<gsl/gsl_sf.h>

int main(){

double range = 6; // max/min values
int N = 100000; // Number of evaluations
double step = 2 * range / N;
std::vector<double> x(N);
std::vector<double> result(N);

for (int i=0;i<=N;i++){
     x[i] = -range + i*step;
     result[i] = gsl_sf_dawson(x[i]);
}


for (int i=0;i<=N;i++){
	std::cout << x[i] << "," << result[i] << std::endl;
}

return 0;
}
Compile with
g++ -std=c++11 dawson.cpp -o ./dawson -lgsl -lgslcblas -lm
Run it and generate some results
./dawson > results.txt
If we plot results.txt we get
This code is also available on GitHub: https://github.com/mikecroucher/GSL_example
Like many people, I was excited to learn about the new Linux subsystem in Windows announced by Microsoft earlier this year (See Bash on Windows: The scripting game just changed).
Along with others, I’ve been playing with it on the Windows Insider builds but now that the Windows Anniversary Update has been released, everyone can get in on the action.
Activating the Linux Subsystem in Windows
Once you’ve updated to the Anniversary Update of Windows, here’s what you need to do.
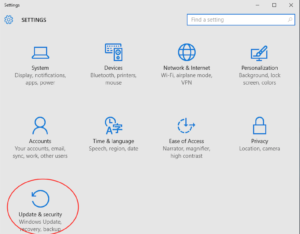
Open settings
In settings, click on Update and Security
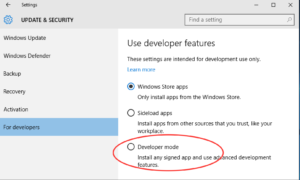
In Update and Security, click on For developers in the left hand pane. Then click on Developer mode.
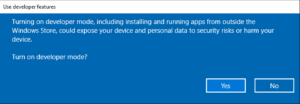
Take note of the Use developer features warning and click Yes if you are happy. Developer mode gives you greater power, and with great power comes great responsibility.
Reboot the machine (may not be necessary here but it’s what I did).
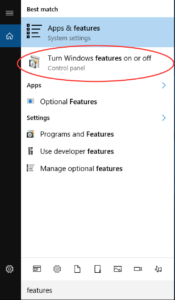
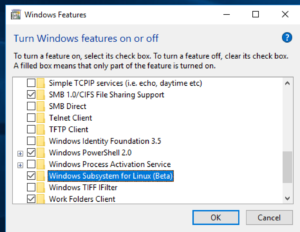
Search for Features and click on Turn Windows features on or off
Tick Windows Subsystem for Linux (Beta) and click OK
When it’s finished churning, reboot the machine.
Launch cmd.exe
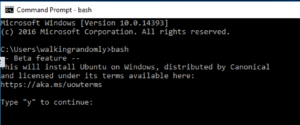
Type bash, press enter and follow the instructions
The linux subsystem will be downloaded from the windows store and you’ll be asked to create a Unix username and password.
Try something linux-y
The short version of what’s available is ‘Every userland tool that’s available for Ubuntu’ with the caveat that anything requiring a GUI won’t work.
This isn’t emulation, it isn’t cygwin, it’s something else entirely. It’s very cool!
The gcc compiler isn’t installed by default so let’s fix that:
sudo apt-get install gcc
Using your favourite terminal based editor (I used vi), enter the following ‘Hello World’ code in C and call it hello.c.
/* Hello World program */

#include

int main()
{
    printf("Hello World from C\n");

    return(0);
}
Compile using gcc
gcc hello.c -o hello
Run the executable
./hello
Hello World from C
Now, transfer the executable to a modern Ubuntu machine (I just emailed it to myself) and run it there.
That’s right – you just wrote and compiled a C-program on a Windows machine and ran it on a Linux machine.
Now install cowsay — because you can:
sudo apt-get install cowsay
cowsay 'Hello from Windows'
 ____________________
< Hello from Windows >
 --------------------
        \   ^__^
         \  (oo)\_______
            (__)\       )\/\
                ||----w |
                ||     ||
Update 1:
I was challenged by @linuxlizard to do a follow up tutorial that showed how to install the scientific Python stack — Numpy, SciPy etc.
@walkingrandomly Follow up with HOWTO on installing NumPy, SiPy, Pillow, etc. :-)
— David Poole (@linuxlizard) August 5, 2016
It’s all there :)
sudo apt-get install python-scipy
Update 2
TensorFlow on LinuxOnWindows is also easy: http://www.hanselman.com/blog/PlayingWithTensorFlowOnWindows.aspx
Yesterday saw the biggest highlight in the technical calendar so far for me… Microsoft has brought the Linux command line to Windows.
Excited by the command line
OK, so I’ll admit it….improvements to command line tools seriously excite me! Windows 10 brought in a couple of minor improvements to the command line last year and I acted like it was a second birthday. Imagine then, the excitement I felt while watching Microsoft’s announcement of linux integration into Windows (Spin to 2:24 to see it). I could barely form sentences! When my wife came into the kitchen to see what the commotion was, all I could manage was “Bash! On Windows!….GIT! OMG! Not a VM! vi..sed..awk…gcc! OMG!’
So why so much excitement?
Shell scripts are more than mere automation, they are repositories of knowledge – they do some task for you and also explain how that task is done. They are wonderful things that can educate, take the drudgery out of a researcher’s life and lead to more reproducible research. The problem is that Linux and Mac users speak a different scripting language (Bash) to Windows users (Windows batch or more, recently, PowerShell).
In short, a script written on a Linux or Mac machine wouldn’t run on a Windows machine unless you jumped through some hoops.
Bash just became a cross-platform scripting solution
Various solutions for running Bash scripts on Windows have existed for a while. Cygwin, for example, compiles linux tools to run on Windows which works very effectively for many situations. Additionally, the Windows version of git comes with an emulated Bash mode that’s good enough to teach the scripting lesson from Software Carpentry. Neither of these solutions are perfect, however, and to me they’ve always felt like slightly awkward patches. The resulting binaries in projects such as Cygwin are necessarily different from those used in Linux Land.
This new collaboration between Canonical and Microsoft changes the game! Now, Linux tools appear like first-class citizens in the Windows world. When you run Bash on Windows, it will be the exact same Bash that’s run on Linux. An automated research analysis developed on a Linux machine will work exactly the same way on Windows.
The same skills apply, from tablet to supercomputer
Furthermore, when we teach introductory shell scripting to researchers we will be teaching them tools that allows them to work on all operating systems and all hardware types.
The same skills will apply to Mac, Linux and Windows from tablets to High Performance Computing clusters and that’s a wonderful thing.
Environment modules are widely used in the High Performance Computing (HPC) world where sysadmins need to install dozens, or maybe hundreds of potentially conflicting applications, libraries and compilers on multi-user machines. The University of Manchester’s Computational Shared Facility (CSF), for example, makes extensive use of environment modules and would be extremely difficult to run without them.
Once the sysadmin has correctly installed an application (MATLAB 2014a say) and set up the corresponding module file, making it available to your shell is as easy as doing
module load apps/binapps/matlab/R2014a
Unloading the module is just as easy
module unload apps/binapps/matlab/R2014a
On a heavily used, multi-user system environment modules are invaluable! Every user can have whatever compilers, libraries and applications they like — they just load and unload whatever they need from the huge selection supported by their ever-friendly sysadmins.
Environment modules on Ubuntu
I needed to install environment modules on a VM running Ubuntu 14.04 for my own use. I found a very nice setup guide at http://www.setuptips.com/unix/setup-environment-modules-on-ubuntu/ but it didn’t work. On attempting to compile, I got the error message
cmdModule.c:644:15: error: 'Tcl_Interp' has no member named 'errorLine'
This is a known bug in version 3.2.9c of environment modules and has a work-around.
I also found a set up guide at http://nickgeoghegan.net/linux/installing-environment-modules which had some useful advice on configuration..
Combining information from these sources, I managed to get a working install. Here are the steps I did in full for a clean Ubuntu 14.04 image
#Install the tcl development package
sudo apt-get install tcl-dev

#Make the directories where my modules and packages are going to live
sudo mkdir /opt/modules
sudo mkdir /opt/packages

#Get the source code. This was the most up to date version as of 25th Feb 2015
wget http://downloads.sourceforge.net/project/modules/Modules/modules-3.2.9/modules-3.2.9c.tar.gz

#unpack and enter source directory
tar xvzf modules-3.2.9c.tar.gz
cd modules-3.2.9

#Configure using the workaround and selecting my module folder
CPPFLAGS="-DUSE_INTERP_ERRORLINE" ./configure --with-module-path=/opt/modules/

#make and install
make
sudo make install

#Edit the modulefiles path. Comment out all lines starting /usr so that only /opt/modules is used
sudo sed -i 's~^/usr~#/usr~' /usr/local/Modules/3.2.9/init/.modulespath

#Configure the shell to use modules
sudo tee /etc/profile.d/modules.sh > /dev/null << 'EOF'
#----------------------------------------------------------------------#
# system-wide profile.modules #
# Initialize modules for all sh-derivative shells #
#----------------------------------------------------------------------#
trap "" 1 2 3

MODULES=/usr/local/Modules/3.2.9

case "$0" in
-bash|bash|*/bash) . $MODULES/init/bash ;;
-ksh|ksh|*/ksh) . $MODULES/init/ksh ;;
-sh|sh|*/sh) . $MODULES/init/sh ;;
*) . $MODULES/init/sh ;; # default for scripts
esac

trap - 1 2 3
EOF

#Add modules to your .bashrc file
echo '#For modules' >> ~/.bashrc
echo '. /etc/profile.d/modules.sh' >> ~/.bashrc
That takes care of the basic setup but modules is pretty useless at this stage. To make it useful, you need to install some extra software and the corresponding module file.
Installing a module file for Anaconda Python 2.1
This is a really simple example of how to set up a basic module file
I downloaded and installed Anaconda Python 2.1 to /opt/packages and created a file called anaconda2.1 in /opt/modules containing the following
#%Module1.0
proc ModulesHelp { } {
global dotversion

puts stderr "\tAnaconda Python 2.1 providing Python 2.7.8"
}

module-whatis "Anaconda Python 2.1"
prepend-path PATH /opt/packages/anaconda/bin
Now, when I do the command
module avail
I get
-------------------------- /opt/modules/ ---------------------------
anaconda2.1
I can load my anaconda2.1 module with the command
module load anaconda2.1
Now, when I type python at the command prompt, I’ll be using Anaconda’s python rather than the system python. Once I’m done, I can unload with
module unload anaconda2.1
This example is so trivial it’s almost not worth it — modules really come into their own when you need to support loads of compilers and corresponding libraries. There’s an example using gcc at http://nickgeoghegan.net/linux/installing-environment-modules.
I recently installed Ubuntu 12.04 on my laptop. I gave Unity a chance for a few days just in case it had improved since I last used it but still found it unusable. The following tweaks made Ubuntu usable again (for me at least).
- Install Bumblebee – I have an NVIDIA Graphics card that makes use of Optimus technology. I learned that NVIDIA do not support Optimus laptops on Linux the hard way but, thankfully, this open source project makes everything work.
- Install Cinnamon – Unity is an awful desktop interface in my opinion. Cinnamon, on the other hand, is very nice indeed
- Fix the scroll bars – Even after switching to Cinnamon, many applications in Ubuntu still use some truly awful window scrollbars. This link shows you how to make them go away.
That was pretty much it and I’m very happy with the result. Do you use Ubuntu? If so, are there any tweaks that you simply must make to the default setup before you feel that it’s usable for you?
I recently maxed out my credit card in order to treat myself to a shiny new Dell XPS L720X laptop that comes complete with Intel i7 sandy bridge processor and Nvidia GeForce GT 555M. The NVidia graphics card was one of the biggest selling points for me because I wanted to do some GPU work at home and on the train using both CUDA and OpenCL. I get asked about these technologies a lot by researchers at The University of Manchester and I wanted to beef up my experience levels.
I wanted this machine to be dual boot Windows 7 and Linux so, before I shelled out my hard-earned cash, I thought I would check that Nvidia’s Linux driver supported the GT 555M. A quick look at their official driver page confirmed that it did so I handed over the credit card. After all, if Nvidia themselves say that it is supported then you’d expect it to be supported right?

Wrong! Here’s my story.
I installed Ubuntu 11.04 from DVD without a hitch and updated all packages to the very latest versions. I then hopped over to NVidia’s website, got the driver (version 275.09.07) and installed it. I’ve gone through this process dozens of times on Desktop machines at work and wasn’t expecting any problems but boy did I get problems. After installing NVidia’s driver, the Dell simply would not boot into Linux. Not only that but it never seemed to fail in exactly the same place twice…the boot process would start just fine and then it would crash…seemingly at random. So, off to the forums I went where I quickly discovered that my system was not as supported as I originally thought.
You see, my laptop has two graphics systems on it: A relatively low-powered Intel one and the NVidia one. It also comes with some cool sounding technology called Optimus that helps save battery power on systems like mine. Rather than explain the details of Optimus, I’m just going to refer you to both Nvidia’s web page about it along with the Wikipedia page.
Here’s the kicker…Nvidia’s Linux driver does not support optimus, even though Optimus is Nvidia’s own technology. They even say that they don’t support it in the Additional Information tab. Furthermore, they have no plans to support it. Sadly, I didn’t even realise that my new laptop was an Optimus laptop until I tried to get the Nvidia drivers on it.
If only I had thought to myself ‘Well, Nvidia may say that they support the 555M but do they really mean it?’ If I mis-trusted the information given on the supported products page then perhaps then I would have read the further information tab and trawled the forums. I chose to trust Nvidia and assume that when a product was listed under ‘supported products’ then I didn’t need to worry. Well you live and learn I guess.
Project Bumblebee
One of the fantastic things about the Linux community is that even if you are let down by your hardware vendor then someone, somewhere may well come to your rescue. For Nvidia Optimus, that someone is Martin Juhl. Martin’s project, Bumblebee, brings Optimus support to Linux which is useful since it seems that Nvidia can’t be bothered!
Installation for Ubuntu users is easy. All you need to do is open up a terminal, type the following and follow the instructions to download and install both the Nvidia drivers along with bumblebee.
sudo apt-add-repository ppa:mj-casalogic/bumblebee
sudo apt-get update && sudo apt-get install bumblebee
To run an application, glxgears for example, you just type the following at the command line
optirun glxgears
Sadly for me this didn’t work. All I got was the following
 * Starting Bumblebee X server bumblebee
_PS0 Enabling nVidia Card Succeded. [ OK ]

 * Stopping Bumblebee X server bumblebee
_DSM Disabling nVidia Card Succeded.
_PS3 Disabling nVidia Card Succeded.
Nothing else happened. I’d report it as a bug-report but it seems that someone with a very similar configuration to me has already done so and work is being done on it as we speak. Plenty of other people have reported success with bumblebee though and I am confident that I will be up and running soon. As soon as I am up and running I’ll owe the developer of bumblebee a beer!
Update 11th July: The bumblebee bug mentioned above has been fixed. I can now run apps via optirun. Not done much more than run glxgears though so far.
I needed to install Labview 2010 onto a Ubuntu Linux machine but when I inserted the DVD nothing happened. So, I tried to manually mount it from the command line in the usual way but it didn’t work. It turns out that the DVD isn’t formatted as iso9660 but as hfsplus. The following incantations worked for me
sudo mount -t hfsplus /dev/sr0 /media/cdrom0 -o loop
sudo /media/cdrom0/Linux/labview/INSTALL
The installer soon became upset and gave the following error message
/media/cdrom0/Linux/labview/bin/rpmq: error while loading shared libraries: libbz2.so.1:
cannot open shared object file: No such file or directory
This was fixed with (original source here)
 cd /usr/lib32
 sudo ln -s libbz2.so.1.0 libbz2.so.1
 sudo ldconfig
When installing MATLAB 2011a on Linux you may encounter a huge error message than begins with
Preparing installation files ...
Installing ...
Exception in thread "main" com.google.inject.ProvisionException: Guice provision
 errors:

1) Error in custom provider, java.lang.RuntimeException: java.lang.reflect.Invoc
ationTargetException
  at com.mathworks.wizard.WizardModule.provideDisplayProperties(WizardModule.jav
a:61)
  while locating com.mathworks.instutil.DisplayProperties
  at com.mathworks.wizard.ui.components.ComponentsModule.providePaintStrategy(Co
mponentsModule.java:72)
  while locating com.mathworks.wizard.ui.components.PaintStrategy
    for parameter 4 at com.mathworks.wizard.ui.components.SwingComponentFactoryI
mpl.(SwingComponentFactoryImpl.java:109)
  while locating com.mathworks.wizard.ui.components.SwingComponentFactoryImpl
  while locating com.mathworks.wizard.ui.components.SwingComponentFactory
    for parameter 1 at com.mathworks.wizard.ui.WizardUIImpl.(WizardUIImpl.
java:64)
  while locating com.mathworks.wizard.ui.WizardUIImpl
  while locating com.mathworks.wizard.ui.WizardUI annotated with @com.google.inj
ect.name.Named(value=BaseWizardUI)
This is because you haven’t mounted the installation disk with the correct permissions. The fix is to run the following command as root.
mount -o remount,exec /media/MATHWORKS_R2011A/
Assuming, of course, that /media/MATHWORKS_R2011A/ is your mount point. Hope this helps someone out there.
Update: 7th April 2014
A Debian 7.4 user had this exact problem but the above command didn’t work. We got the following
mount -o remount,exec /media/cdrom0

mount: cannot remount block device /dev/sr0 read-write, is write-protected
The fix was to modify the command slightly:
mount -o remount,exec,ro /media/cdrom0
I’ve been a user of Ubuntu Linux for years but the recent emphasis on their new Unity interface has put me off somewhat. I tried to like it but failed. So, I figured that it was time for a switch to a different distribution.
I asked around on Twitter and got suggestions such as Slackware, Debian and Linux Mint. I’ve used both Slackware and Debian in the past but, while they might be fine for servers or workstations, I prefer something more shiny for my personal laptop.
I could also have stuck with Ubuntu and simply installed GNOME using synaptic but I like to use the desktop that is officially supported by the distribution.
So, I went with Linux Mint. It isn’t going well so far!
I had no DVDs in the house so I downloaded the CD version, burned it to a blank CD and rebooted only to be rewarded with
Can not mount /dev/loop0 (/cdrom/casper/filesystem.squashfs) on //filesystem.squashfs
I checked the md5sum of the .iso file and it was fine. I burned to a different CD and tried again. Same error.
I was in no mood for a trawl of the forums so I simply figured that maybe something was wrong with the CD version of the distribution – at least as far as my machine was concerned. So, I started downloading the DVD version and treated my greyhound to a walk to the local computer shop to buy a stack of DVDs.
When I got back I checked the .md5 sum of the DVD image, burned it to disk and…got the same error. A trawl of the forums suggests that many people have seen this error but no reliable solution has been found.
Not good for me or Linux Mint but at least Desmond (below) got an extra walk!

Update 1 I created a bootable USB memory stick from the DVD .iso to elimiate any problems with my burning software/hardware. Still get the same error message. MD5 checksum of the .iso file is what it should be:
md5sum ./linuxmint-11-gnome-dvd-64bit.iso
773b6cdfe44b91bc44448fa7b34bffa8  ./linuxmint-11-gnome-dvd-64bit.iso
My machine is a Dell XPS M1330 which has been running Ubuntu for almost 3 years.
Update 2: Seems that this bug is not confined to Mint. Ubuntu users are reporting it too. No fix yet though
https://bugs.launchpad.net/ubuntu/+bug/636711
Update 3: There is DEFINITELY nothing wrong with the installation media. Both USB memory stick and DVD versions boot on my wife’s (much newer)HP laptop with no problem. So, the issue seems to be related to my particular hardware. This is like the good old days of Linux where installation was actually difficult. Good times!
Update 4: After much mucking around I finally gave up on a direct install of Mint 11. The installer is simply broken for certain hardware configurations as far as I can tell. Installed Mint 10 from the same pen drive that failed for Mint 11 without a hitch.
Update 5: As soon as the Mint 10 install completed, I did an apt-get dist-upgrade to try to get to Mint 11 that way. The Mint developers recommend against doing dist-upgrades but I don’t seem to have a choice since the Mint 11 installer won’t work on my machine. After a few minutes I get this error
dpkg: error processing python2.7-minimal (--configure):
 subprocess installed post-installation script returned error exit status 3
Errors were encountered while processing:
 python2.7-minimal
This is mentioned in this bug report. I get over that (by following the instructions in #9 of the bug report) and later get this error
p: cannot stat `/usr/lib/pango/1.6.0/module-files.d/libpango1.0-0.modules': No such file or directory
cp: cannot stat `/usr/lib/pango/1.6.0/modules/pango-basic-fc.so': No such file or directory
E: /usr/share/initramfs-tools/hooks/plymouth failed with return 1.
update-initramfs: failed for /boot/initrd.img-2.6.35-22-generic
dpkg: error processing initramfs-tools (--configure):
 subprocess installed post-installation script returned error exit status 1
Errors were encountered while processing:
 initramfs-tools
I fixed this with
sudo ln -s x86_64-linux-gnu/pango /usr/lib/pango
Trying the apt-get dist-upgrade again leads to
The following packages have unmet dependencies:
 python-couchdb : Breaks: desktopcouch (< 1.0) but 0.6.9b-0ubuntu1 is to be installed
 python-desktopcouch-records : Conflicts: desktopcouch (< 1.0.7-0ubuntu2) but 0.6.9b-0ubuntu1 is to be installed
Which, thanks to this forum post, I get rid of by doing
sudo dpkg --configure -a
sudo apt-get remove python-desktopcouch-records desktopcouch evolution-couchdb python-desktopcouch
A few more packages get installed before it stops again with the error message
Unpacking replacement xserver-xorg-video-tseng ...
Processing triggers for man-db ...
Processing triggers for ureadahead ...
Errors were encountered while processing:
 /var/cache/apt/archives/xserver-xorg-core_2%3a1.10.1-1ubuntu1.1_amd64.deb
E: Sub-process /usr/bin/dpkg returned an error code (1)
I get past this by doing
sudo apt-get -f install
Then I try apt-get upgrade and apt-get dist-update again…possibly twice and I’m pretty much done it seems.
Update 6: On the train to work this morning I thought I’d boot into my shiny new Mint system. However I was faced with nothing but a blank screen. I rebooted and removed quiet and splash from the grub options to allow me to see what was going on. The boot sequence was getting stuck on something like checking battery state. Up until now I had only been using Mint while connected to the Mains. Well, this was the final straw for me. As soon as I got into work I shoved in a Ubuntu 11.04 live disk which installed in the time it took me to drink a cup of coffee. I’ve got GNOME running and am now happy.
My Linux Mint adventure is over.


